
I am very excited to share with you my new felt wallet! I think it came out great, and I even took enough photos to do my very first tutorial with you!
I started with all kinds of fun colors of felt. I have been using the felt made from recycled plastic bottles, and it works fine for these types of projects. Wool would work great, too.
First I cut out the 'outside' of the wallet. I made mine 4 1/4 inches tall x 9 1/2 inches wide.

Then I cut the 'inner' piece which was smaller. Mine measures 4 inches tall x 7 3/4 inches wide.

Then I cut out the card pockets. At first I cut out 3 pockets per side (as you can see above) but then I realized that would make my wallet really fat. So I paired it down. The purple and yellow pockets below measure inches 3 inches tall x 3 1/2 inches wide and the smaller blue pockets are 2 1/4 tall x 3 1/2 wide.

Next I got out the fun colors of embroidery thread and started with the purple larger pocket. I did a blanket stitch around the top and inner sides to finish the edges, then I used a card to measure how far I wanted my cards to sit in the pocket. I then did a quick running stitch across that measurement:

I then blanket stitched around the smaller blue pocket that layers on top of the purple pocket:

Since the bottom and sides are going to be stitched in with the rest of the wallet shortly, I left those unfinished for now. I made the pockets stay securely tacking the pocket corners to the green 'inner' piece.
I did the same thing to the other pockets but opposite :)

And:

The right side of the 'inner' pieces needed to be finished, as well as the top and upper left side, so I sewed a blanket stitch (surprise!) around that, too:

I decided I wanted something on the face or 'outside' of the wallet, so I just did a basic heart with a cute little button:

And now it is time to blanket stitch them all together! I have to admit that the bottom is a little thick, but it works:


Almost done! Now we need some way to close it up. I decided to to cut little circles out of the felt for the closure. I cut 4 small circles about the size of a nickel, and then took 2 and used my favorite stitch to sew them together to make them thicker.
 And now we are ready to sew them on! I folded my new wallet and sewed one onto the flap and one onto the mid but sorta left side of the folded wallet to allow for varying thicknesses (in case I have a bunch of money....hahaha). I then used embroidery thread as my string to loop around in a figure 8, but you could use ribbon, etc.
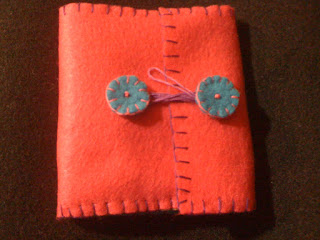
And its done! Here are a few more photos of the finished product:


I started with all kinds of fun colors of felt. I have been using the felt made from recycled plastic bottles, and it works fine for these types of projects. Wool would work great, too.
First I cut out the 'outside' of the wallet. I made mine 4 1/4 inches tall x 9 1/2 inches wide.

Then I cut the 'inner' piece which was smaller. Mine measures 4 inches tall x 7 3/4 inches wide.

Then I cut out the card pockets. At first I cut out 3 pockets per side (as you can see above) but then I realized that would make my wallet really fat. So I paired it down. The purple and yellow pockets below measure inches 3 inches tall x 3 1/2 inches wide and the smaller blue pockets are 2 1/4 tall x 3 1/2 wide.

Next I got out the fun colors of embroidery thread and started with the purple larger pocket. I did a blanket stitch around the top and inner sides to finish the edges, then I used a card to measure how far I wanted my cards to sit in the pocket. I then did a quick running stitch across that measurement:

I then blanket stitched around the smaller blue pocket that layers on top of the purple pocket:

Since the bottom and sides are going to be stitched in with the rest of the wallet shortly, I left those unfinished for now. I made the pockets stay securely tacking the pocket corners to the green 'inner' piece.
I did the same thing to the other pockets but opposite :)

And:

The right side of the 'inner' pieces needed to be finished, as well as the top and upper left side, so I sewed a blanket stitch (surprise!) around that, too:

I decided I wanted something on the face or 'outside' of the wallet, so I just did a basic heart with a cute little button:

And now it is time to blanket stitch them all together! I have to admit that the bottom is a little thick, but it works:

And the inside:

Almost done! Now we need some way to close it up. I decided to to cut little circles out of the felt for the closure. I cut 4 small circles about the size of a nickel, and then took 2 and used my favorite stitch to sew them together to make them thicker.


And its done! Here are a few more photos of the finished product:


No comments:
Post a Comment